(picture from Google Images)
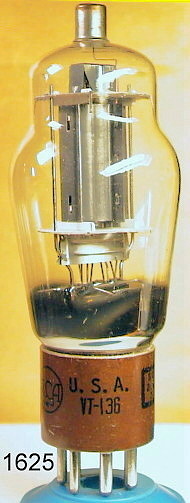
I've resisted the siren call of DIY audio for far too long. Since my busy mind is always in need of some new project, I've decided to once again tackle a SE amplifier. For this undertaking, I'll go for a budget build, using easy to get tubes with a vintage flavor. With a total price of under $600, Tte 1625 immediately sprung to mind - this is the 12V filament version of the famed 807, the precursor to the 6L6GC. Instead of Ultralinear or Triode, I've also decided to try out true Pentode operation.
I'm normally a triode or ultra-linear guy, but way back in my college days, I was walking along the sidewalk in the nasty neighborhood I was living in at the time. Ahead I saw a Magnavox stereo console out on the curb. A peek at the back and I saw tubes. With a little determination out came a little 6BQ5 amplifier with a pair of tiny open-frame output transformers. A SE amplifier! I brought this little unit back home, installed some RCA jacks, and soon had the amplifier up and running. The sound, for only 5Ws of power, was amazing. Sure, the low bass wasn't there, but there was a rightness to the music - especially the critical midrange. Not bad for a hunk of roadside trash. I ended up selling the Maganvox unit off to a friend where it was dubbed the "5W wonder". Yes, at the time I got better results with 2A3s and 300Bs in single-ended mode, but they had the benefit of better iron and passive components. After all these years, I'm still curious to see how a pure pentode amplifier with good parts will sound.
Of course it will have my usual tricks and favorites: tube rectification with the vintage 5Z3, screen regulation using VR tubes, a pentode input tube - the 12J7GT, and DC on the filmanents. So far I'm leaning towards Edcor for the output transformer with Hammond and Triad power and choke iron. Other parts will be KOA resistors, Wima coupling caps, Nichicon electrolytics, and whatever else I can scare up from my depleted junk drawer.
The initial schematic is already done, but may not survive once I get the first prototype up and running. So stay tuned for further updates when I will make the parts list available, along with the Front Panel Express metal layout, and final schematic. I will also try to include a step-by-step construction guide, but I usually get a little carried away when building a new project!
Update: Amplifier built - schematic and results.